
With the engine and gearbox bolted together, the assembly can be trial-fitted in the engine bay. The assembly will have to be dropped in at a rather steep angle to clear the front crossmember.
Bolt the motor mount rubbers to the engine brackets and to the pedestals using either lockwashers or nylon stopnuts.
A standard Toyota transmission mount, as called for by the mating gearbox, is used.
A 1-1/2" (38mm) thick block of aluminum is fashioned to form a spacer between the rubber mounting plate and the stock Toyota crosspiece. This is to raise the gearbox in the tunnel.
The gearselector housing may have to be replaced on some later model gearboxes to have the stick come out in the same location as the stock BMC. This is about a 30 minute job needing only the rear tailshaft gasket. (You might want to replace the rear seal while you have this opened up). The transmission case is split to fit the three matching selector rods.
The later model gearselector housing is about 6" (150mm) longer than the earlier one. This would put the selector stalk about in the middle of the transmission tunnel and would require further widening and deepening of the tunnel. A forward bent lever similar to that in Cobras would be called for. I never thought this was particularly attractive, even in a Cobra.
The Toyota shift lever is a rubber isolated type. To shorten this lever, put the lower portion (the part with the pivot ball) in a soft jaw vise. Heat the upper section of the lever with a torch until the rubber begins to smoke. With a pair of pliers or ViseGrips, twist the upper lever to break the rubber free. Remove the upper lever, spring, and pivot retainer. This leaves a short stub of a lever on the pivot ball. Clean this up with a wirewheel. The remnants of the rubber should come off easily.
The upper lever section can be shortened and drilled/reamed to slide down over the pivot stub to obtain the proper lever length. If you desire, the top thread can be turned down on a lathe and a new 3/8-24 thread cut. This will allow a BMC shift knob to be used.
The original metal bubble used to cover the selector lever pivot is not used. Instead, a MGB shifter boot and trim ring are fastened to the top of the tunnel (after carpet installation).
The frame just below the clutch slave cylinder may have to be relieved somewhat to clear the lower part of the cylinder. This is done by setting a sabersaw baseplate to 45 and cutting the inside corner of the frame in about 1" (25mm). Form a plate to cover the opening and weld.
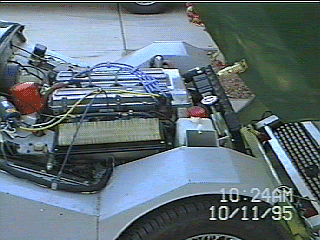
I have found that the best way of running the clutch hose is to have a hard-line from the cylinder up to one of the intake manifold studs. This line is fixed to the manifold stud with a clip. A flexline connects between this line and another hard-line terminating at the master cylinder. This arrangement puts the flexline higher up on the engine to facilitate future inspection and replacement.
The best correct radiator for a application is usually a factory-matched unit. Toyota Corolla units are plentiful in scrapyards and are not expensive to buy new.
Six inch (150mm) extensions made from 2" (50mm) square box-section steel are welded to the front frame horns at right angles just below the original radiator uprights. Aluminum 90, 2" (50mm) angle is bolted to the these extensions and angled back about 7. Small aluminum channel, 1" (25mm) square are fashioned to fit between the angled uprights and the inner wings. This forms a very rigid structure to hang the radiator.
Always mount the radiator using rubber doughnuts or grommets. Never bolt the radiator solidly, as vibration will so cause joint leaks.
A combination of steel or aluminum pipes with short sections of rubber hose complete the cooling system installation.
Always bead the tubing to prevent the hoses from slipping off and use worm-type hose clamps.
It is a good idea to use a closed cooling system with a expansion bottle. This allows the system to operate at a higher pressure a thus a higher boiling point. Any aftermarket expansion bottle kit can be used with an appropriate pressure cap.
Although a engine mounted fan could probably be used, a high-efficiency electric fan provides more flexibility in radiator angle and placement. All electric fans should be used with a shroud. A shroud can be bent from lightweight aluminum and should be a least 1" (25mm) deep from proper air flow. The shroud is fitted tightly to the back of the radiator to prevent any air leaking in from the sides. This forces all the air to be drawn through the core for maximum cooling.
A 12" (300mm) fan with a thermostatic switch and relay will work on a stock engine at ambient temperatures up to 110 F (43C). High performance engines or higher ambient temperature may need a larger, or multiple fans.
The split-sliding MG driveshaft is replaced with a fixed-length type. The Toyota gearbox incorporated a sliding U-joint yoke that makes the old MG slider redundant. There are driveshaft specialists in many areas of the country who make this one of the easiest parts of the swap. These specialist can make virtually any driveshaft to fit any application. Call and ask what specific dimensions they need to built a prop shaft. Mine just needed the distance from the face of the transmission seal to the differential flange face, at normal ride height. This dimension is measured with the rear axle resting on jackstands. The axle must not droop for this measurement to be accurate.
Other firms may need a u-joint center-to-center dimension. This is taken in the same manner, but with the sliding shaft fitted and pulled out about 1 1/2" (38mm) from bottom. This clearance prevents the slider from bottoming on suspension plunge.
If your car is LHD, the accelerator linkage only needs a longer cable. This can be readily made by any motorcycle shop.
On the other hand, RHD vehicles will need a different pedal and cable arrangement. This is due to the cable mounting hole emerging just under the intake manifold. This hole is sealed off and the original pedal and cross-shaft removed.
A pedal assembly from either a early MGB or a Spitfire replaces the original with a custom bracket. The pedal lever will probably need to be bent around slightly to achieve proper pedal location and height.
A MGB throttle cable is used with the carburetor-end modified to fit the Japanese carbs.
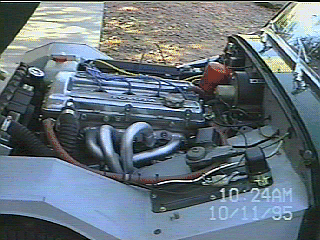
A custom set of header pipes are necessary. None of original Toyota manifolds have a forward facing exit dictated by the left footwell location.
Although a 4-1 arrangement could be made to fit, the limited space between the engine, the splash guard, and the frame calls for a 4-2-1 primary arrangement. This is commonly referred to as a "Tri-Y" system and delivers a better low-end torque curve at the marginal loss of some top-end horsepower.
Some say stainless steel exhaust system is the only way to go. I have run a mild steel system for over ten years with no rust-through. This may be attributed to my driving style (few short trips, long trips allow moisture to evaporate) or the Arizona climate. Stainless steel is very hard to work with, but such a system would probably outlast the rest of the car.
If you're using a T-block, the standard placement of the oil filter will foul the right footwell. The oil filter is relocated by means of a oil bypas sandwich plate bolted to the engine and a remote oil filter bracket mounted in a easily accessable spot in the engine compartment. These two blocks are connected with appropriate high pressure oil line. Although reinforced rubber hose can be used, I prefer braided stainless steel line for its long life and resistance to abrasion. This would also be a good time to add a oil cooler.