
In my particular vehicle, I performed several changes not directly related to the engine swap but designed to enhance the overall reliability, performance, or comfort of the Spridget.
I replaced the Lucas two-fuse box, with its marginal spring clips with a modern six-position, blade-type fuse box. I reorganized the wiring to eliminate all unfused circuits and to separate some of the interconnected-but-logically-independent systems to give them their own fuse. I have yet to have an electrical problem surface that was traced to a short or cross-wiring as is usually typical with Lucas designs. In fact, the only malfunctions I have experienced have been the fault of the Lucas bullets and sockets.
Although the Toyota is not much heavier than the BMC unit it replaces, I decided to replace the front wings, valance, and bonnet with a single-piece front end made of Glass Reinforced Plastic (GRP). This was meant to gain better fore/aft weight distribution and improve handling.
The front-end is hinged by way of mounts bolted to the front bumper mounting points on the forward frame horns. Heim (Rose) joints were used to provide some compliance and adjustment in the pivot.
The latches used to secure the bonnet were sourced from a racing spares supplier. They were designed as body panel latches for Formula cars and are very reliable, due to a double-catch release, and small, only about 2" (50mm) long.
The grille that best fits these fiberglass bonnets is the one-piece type as fitted to the early 70's Midget or Sprite. It is a snug fit to the opening and is used without the aluminum grille surround pieces normally pop-riveted to the grille aperture.
I replaced the old mechanical windscreen washer hand pump that would never stay primed with a push-button switch and universal electric washer pump. The original washer bottle can be used, but the later plastic bottle from a 1500 has a much bigger capacity a rest neatly in the valley between the inner wing and the footwell.
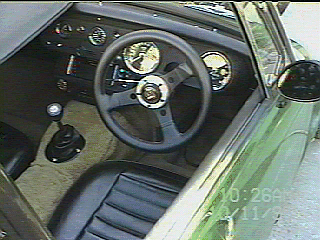
I also converted my Midget from LHD to RHD to gain some additional clearance for the exhaust headers and the alternator. This is a straight forward conversion that, with the proper bits, can be accomplished in about hour.
The LHD steering rack is replaced with the RHD equivalent piece. It must be installed and shimmed in accordance with the instructions given in the Haynes manual or either the steering column, the rack, or the rack brackets will be damaged. RHD rack can be had from a number of used parts companies advertising in the British classic car magazines.
The dashboard is likewise obtained from auto dismantler and fitted has described in Haynes. The wiring loom does not need to be replaced. It merely folds over in the middle of the dashboard, and is reconnected to the instruments and switches.
The clutch and brake pedal assembly with the master cylinders are unbolted and swapped with the blockoff plate on the opposite footwell. Reroute the pipes and you're done.
Depending on your preference, the directional indicator switch can be mounted on the left or the right side of the steering column. In either case the steering is rotated and clamped to the rack stub to put the canceling bolt on the same side as the indicator stalk. The switch itself is that same for either right or left mounting, but the cover is different.
For RHD, the wiper blades park laying to the right rather than the left. This is adjusted by loosening the three screws on the top of the wiper motor that clamp the park switch. The switch is rotated 180, and the screws tightened. Wiper blade arms with the angle in the opposite direction are available from sources in the U.K.