It's What's up Front that Counts!
or
The care and feeding of Morgan Front suspension
Last update: 02/02/2000

©By: Jerry Willburn
Formatted for the Morgan Web page by John T. Blair
Last update: 02/25/97
The basis of this article (containing more than you ever wanted to know
about front suspensions) was written by Don Morrill in 1971 and is
presented here with some changes, updates and a few added sections.
Introduction
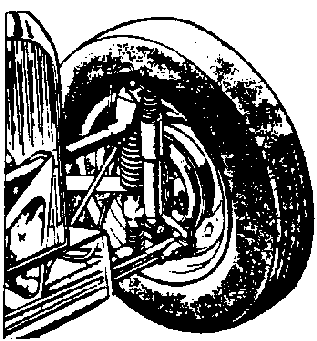
A high wear point on the Morgan, and believe it not not, there are a
few, is the brass bushings that are pressed into the front wheel
spindles, and ride on vertical kingpin (center pin). To check for wear,
jack up the front end and have someone wiggle the front wheel about the
horizontal (hold the top and bottom), and look formovement of the lower
end of the spindle with respect to the lowerrebound spring. Bushing wear
results in a certain vagueness in steering, and a feeling of front end
looseness, but otherwise is not serious except in the extreme. Wheel
shake is not cured by rebushing. Although the shake may disappear
at first, when the bushings wear-in the shake will return. Wheel shake is
usually caused by loose damper blades or square wheels.
To gain familiarity with the front suspension, sketches are provided that
show things ex-works. If your car has been repaired due to
 front end damage, a check is worth while to determine if everything is
there, and properly installed. Most body-shops are relaxed about keeping
track of attaching hardware, so some imagination might have been exercised
during assembly. Most of the suspension hardware is Whitworth and holes
are sized for the English bolts (Ed. later cars '70 on are metric).
If American Standard has been substituted, additional hole clearance will
result.
front end damage, a check is worth while to determine if everything is
there, and properly installed. Most body-shops are relaxed about keeping
track of attaching hardware, so some imagination might have been exercised
during assembly. Most of the suspension hardware is Whitworth and holes
are sized for the English bolts (Ed. later cars '70 on are metric).
If American Standard has been substituted, additional hole clearance will
result.
Check for missing parts. As Mr. Morgan is not known for using two bolts
where one will do, if you car is missing anything, the results will catch
up. Make sure the shocks are secure at both ends, that the damper blades
are intact, that chassis
stays are tight, and the center pin bolt and
nut are tight. Have someone rock the steering wheel about center and
check for vertical motion of the steering drop arm (See Morgan Owners
Manual -- the one that should come with the car) or motion of the damper
blade components. Make sure the damper blade is sandwiched between
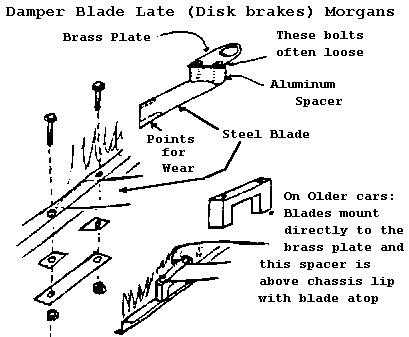
chassis and metal strip but can move freely. Older (Drum Brake)
Morgans do not have this aluminum spacer as shown.
The spacer is mounted on the chassis Z-section but serves the same function.

Areas that may require attention
- Shock absorber replacement
- Upper shock bracket replacement
- Damper blade replacement
- Front wheel bearings
- Center Pin and bushing replacement
- Cross-axle stay adjustment.
Brakes and steering will be considered another day.
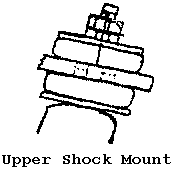
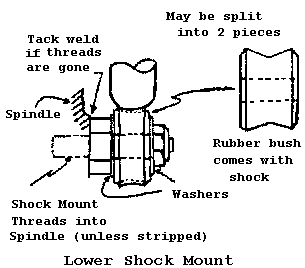
Shock absorber replacement
- Use two 9/16" open-end wrenches to remove the two nuts at the top
of the shock (one nut is used as a jam-nut).
- Push strut into the body of the shock.
- Remove the 5/8"-W nut at the bottom shock mounting stud.
- Work off the shock.
 Access for shock replacement is by jacking up the front end and removal of
the wheels. I suggest putting a light coat of chassis lube grease on the
rubber fittings at the bottom of the shock so it moves easily on the
mounting stud.
Access for shock replacement is by jacking up the front end and removal of
the wheels. I suggest putting a light coat of chassis lube grease on the
rubber fittings at the bottom of the shock so it moves easily on the
mounting stud.
Replacement Shocks (Front only)
Armstrong   AT7/1401/C   (Original Equip)
Monroe      1027 C12C2   (Non-adjustable)
Gabriel     CSAA 45015   (Adjustable)
Koni        80-1021      (Adjustable)
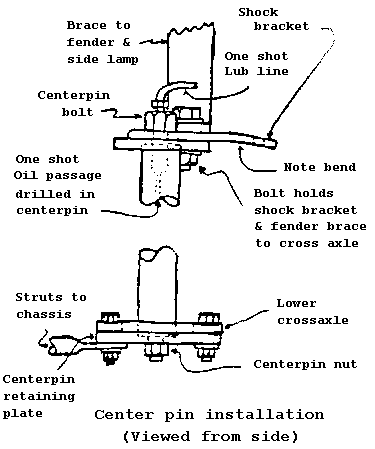
Upper Shock Bracket Replacement
- Remove the shock from the top attachment (bracket) as above.
- Remove bolt that holds fender brace and bracket to upper cross-axle
(this may be hard due to limited access at lower end); Wrench size is
1/4"-W, Open-end.
- Use 3/16"-W open-end wrench to remove one-shot lube fitting from the
center pin bolt.
- Use 7/16"-W wrench to remove center pin bolt and free the Shock Mount
Bracket.
Access as per Shock removal, but cross-axle must be resting on support,
front wheels off the ground, to prevent the center pin from separating from
the upper cross-axle. Car must not be moved with the center pin bolt
removed. You can have the broken bracket welded or purchase one from Club
Spares, or from Isis Imports, or from England. (Ed. Or check the
list of suppliers in the Suppliers and Cross-reference article on the
Morgan Web page).
Damper Blades
Unless the brass portion that fits between the spindle and upper rebound
 spring has worn out or is missing, repairs will not require disassembly of
the front suspension.
spring has worn out or is missing, repairs will not require disassembly of
the front suspension.
The damper blades are designed to prevent the upper rebound spring from
influencing the steering due to spring "wind-up". In fact the damper
blades attenuate minor front wheel shimmy, and thus its name. Unless you
have an early Series I 4/4, you should have damper blades with parts layout
generally as shown in the sketches.
The damper blade assembly consists of a bronze plate sandwiched between the
upper rebound spring and the stub-axle casting. A wide strip of spring
steel is bolted to the bronze plate and runs to the frame, where it is
either bolted down solid (Series I 4/4) or it is sandwiched between a
plate and the frame. There is a triangular metal shim at each end of this
sandwich. The damper blades lie between the shims. Any fore and aft
movement of the damper blade can, therefore, be adjusted out with the
shims by merely slackening one of the bolts holding the assembly and
tapping on the shim. This is an easy but important adjustment. If the
slack in the damper blades is not taken up, wheel wobble (shimmy) often
results.
 If the damper blades show excessive wear (see sketch), they should be
replaced. Simply unbolt from the brass ring and slip them out of the
clamp on the frame. Slip in the new blade and bolt to the brass ring. Do
not forget to adjust the shims after replacement of the damper blades.
If the damper blades show excessive wear (see sketch), they should be
replaced. Simply unbolt from the brass ring and slip them out of the
clamp on the frame. Slip in the new blade and bolt to the brass ring. Do
not forget to adjust the shims after replacement of the damper blades.
Have someone rock the steering wheel and note the fore and aft movement of
the damper blade. Their movement should not exceed 1/32". If it does,
adjust the shims.
Front Wheel Bearings
Early (Drum Brake) cars up to about SN4203, have ball bearing front hubs
with a distance piece between the two races. The outer race of the inside
bearing is held in place by a screwed ring. This should be drilled and
cotter pinned in place. Failure to do so may cause loss of the wheel (ask
Ted Robinson). Later Disk Brake cars have roller bearings.
Part numbers for ball bearing cars
Inboard:        Federal LS11
Outboard:       Federal MS7
Seal:           Aeroquip 962482A


Part numbers for roller bearing cars
  +4 and 4/4 (5/8" Taper)
Inboard:
  Inner Race (rollers/cage)  Timken  1988
  Outter Race                Timken  1922
Outboard:
  Inner Race (rollers/cage)  Timken 03062
  Outter Race                Timken 03162
  Seal                       Aeroquip 962487A

Part numbers for +8 and Racing Suspension +4 (3/4" Taper)
Inboard
  Inner Race (rollers/cage)  Timken 14125A
  Outter                     Timken 14274
Outboard
  Inner Race (rollers/cage)  Timken 09067
  Outter                     Timken 09195
  Seal                       Aeroquip 900295A
Hub Removal
On disk brake cars, the caliper will have to be removed. The caliper is
attached with two bolts (18mm), usually safety wired together.
Do not remove the brake hose from the caliper. Hang the works on a
coat hanger in some out of the way place.
- Remove the cotter key on the axle nut. On wire wheel hubs, rotate the
hub until the two holes are aligned such that the pin can be worked out.
- On Drum brakes, back-off the adjustment cams.
- A 1" socket is required to loosen the spindle nut. Use 26mm if the
nut has been buggered up a bit.
- Slip the hub off. Ball bearing hubs will require a puller. Screw the
spindle nut part way back on when breaking loose with the puller. This will
prevent the spreading of the spindle end from puller pressure.
Clean the wheel bearings thoroughly and inspect them for any signs of
pitting on either balls/rollers or races. Ball bearings can be spun (dry)
while holding by the inner race at about 45 degrees from the horizontal.
You can usually feel wear (pitting) as a "grabbing" feeling.
Pack the bearings with clean grease and install in the inverse of
disassembly.
Be sure to cotter pin the retaining rings on inboard ball bearings.
On wire wheel hubs, be sure that the right side and left side are not
mixed. Mark them on removal! (Ed. This happened on my car, before
I purchased it. Every couple of days, as I would go to stop, the spinner
would fly off the wheel and down the street!.)
Tension tapered roller bearings by tightening them to 20 ft-lbs of torque,
and then back-off one "flat" on the nut.
Disassembly of Front Suspension
First: Degrease the front suspension. If a 25 cents car wash is available,
use it. (Ed. For sure! Most of then now cost $1.00 or more.) The
front end becomes unbelievably greasy due to oil from the one-shot lube and
road dirt. I cut this corner last time and am still tracking grease into
the house. Kerosene is OK, never use gasoline if you value your life!
- Remove Shock Absorber. (See above)
Note: Steps 2 through 4 may be disregarded if the front suspension
is to be disassembled to replace the brass damper blade ring only.
- Separate the spindle from the track rod. Remove the cotter key and
castle nut (5/8" open end). Use a Snap-On puller (P/N CJ89A/CJ89-3) to
separate. Clever people can get them off with a hammer, but I'm not one
of them. Slip the puller "C" disk between the rubber seal and spindle arm
and install the puller. Screw bolt end of puller onto the rod end bolt.
Things will separate with a loud snap.
- Remove disk brake calipers. Hang the caliper on a wire as in hub
removal. On drum brake cars the fluid line must be broken.
- Remove the hub (see hub removal).
- Remove bolts (2) at the bottom of the suspension, one also holds a
stay that attaches to the chassis (1/4"-W).
- Place a jack which is about 8" extended, under the lower center pin
retaining nut (between the bolts just removed). The car must be at least
12" off the floor to remove the center pin.
- Remove the one-shot lube fitting connection to the center pin (1/4"-W).
- Remove the center pin bolt (7/16"-W). As the bolt is removed, the
center pin will move down due to the spring force. However, the jack will
permit control of this force. After the bolt is removed, let the jack down
SLOWLY. Next, carefully jerk the upper rebound spring out at the top. Use
caution, as this spring will still be slightly compressed. (Ed. I
usually put an old pillow under the fender well to protect it just incase.)
- The upper rebound spring and the cover tube can be removed along with
the damper blade at this point.
When you have all the parts disassembled you will find major wear to the
lower bush, primarily on the inboard side (away from the hub). In extreme
cases the spindle holder may also be worn.
Bushing Fitting
Removal and replacement of bushings consists of three major steps.
- Remove the old bushings.
- Install the new bushings.
- Ream the bushings to fit the center pin.
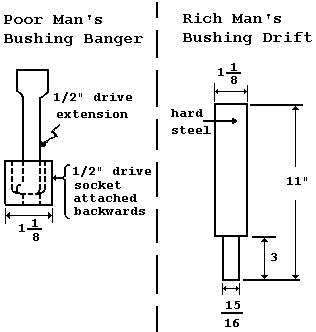
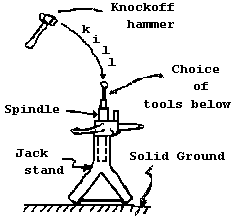 Bushing Removal
Removal requires a bushing tool (see sketch) that will push out the
bushings and clear the ID of the spindle. Use a jack stand to hold the
spindle, and a drift (rich mans or poor mans) to drive out the bushing. A
brass knock off hammer is about the right weight. Both bushings are driven
out from the same side.
Bushing Installation
Installation is best done using a hydraulic press (most auto machine shops
can do this). In a pinch you can, with care, use the rich mans drift and
drive them in.
Bushing Reaming
The post-installation ID of the bushings is smaller than prior to
installation. Therefore, even though the bushings fit the center pin
before installation, they will require reaming after installation. A
reamer (J. C. Whitney, P/N 52-207) is adjusted progressively to remove
more metal until the center pin will slide through the spindle with low
resistance and very little play.
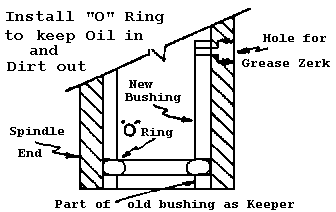
A Modification
We have had good luck at extending bushing life, and keeping the front
suspension clean, by installing an "O" ring to keep the oil in and the dirt
out. Drive the bottom bushing in about 1/4" deeper during installation.
Cut off about 3/16" from you old bushing. After reaming, insert an "O"
ring in the bottom and hold it in place by driving in the 3/16" piece cut
from your old bushing (see sketch). Be sure that the grease hole at the
top end of the bushing is not obscured. If it is, drill it through, taking
care not by bugger up the threads.
Assembly of the Front Suspension
1. The lower C/P retaining plate must be removed from the old C/P and
installed on the new one.
2. Muscle the upper rebound spring and cover into position at the upper
suspension member (don't forget the damper blade!), and drop a screwdriver
through the center pin bolt hole to hold the spring in position.
3. Lubricate the spindle bushing area and C/P with chassis grease prior to
assembly and perform a routine chassis lubrication when the job is completed.
4. Slide the center pin up through the lower rebound spring, spindle, upper
rebound spring, and cover. Place the jack under the center pin nut at the
bottom.
5. Work the center pin into the suspension using the jack. Watch out for
the spindle hanging up on the cover (inside the upper rebound spring).
6. You will probably find that the jack will not force the center pin
completely in as the jack will lift the whole car! The retaining plate
can usually be drawn home by using long bolts. These will have to be
replaced after the top is secure. Remember this when placing the jack so
a bolt can be inserted into the holes.
Note: We have installed an eye bolt in the garage floor. The
cross-axle can now be chained down so that it will not lift. The assembly
can now be jacked right home. This is a must if the engine is out of the
car while doing suspension work.
7. Install the center pin bolt from the top into the center pin. Use a
small mirror and flashlight to center the pin under the hole. This can be
difficult! When the center pin is under the hole, thread the bolt home,
and this completes the assembly process.
Note: Do not try to thread the center pin bolt into the center pin
by "feel". If you miss and cross thread the bolt, you will ruin both the
center pin and the bolt. For the same reason, do not use the center
pin bolt to jack home the assembly.
 8. The hub, if removed, can now be installed. If you have tapered roller
bearings, adjust for minimum play (tighten the spindle nut to 20 ft-lbs,
then back off one flat).
8. The hub, if removed, can now be installed. If you have tapered roller
bearings, adjust for minimum play (tighten the spindle nut to 20 ft-lbs,
then back off one flat).
9. Install the steering track rod if removed.
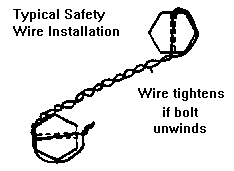
10. Install the caliper when the hub is on (Disk brakes only). Be sure to
safety wire the bolts properly (see sketch).
11. Install the one shot oil pipes.
12. Adjust Drum Brakes.
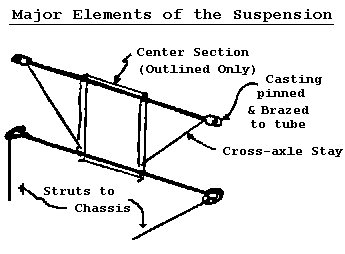
Cross-Axle Stay adjustment
The purpose of the cross-axle stays is to triangulate the cross-axle beams
into a rigid structure, and thus prevent flexing during bump and rebound.
The cross-axle stays are adjusted so that they are always in tension. Too
little tension and the front will sag. Too much tension may snap the stay.
Tension in the cross-axle stays should be adjusted before having the front
end aligned, and checked after alignment.
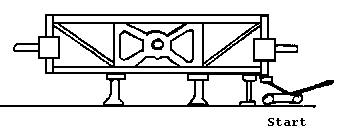
- Place the car on jack stands as shown. The weight of the car should
be supported by the two inner stands. The outer stands could be distance
measuring blocks.
- Jack on the outer end of one side SLOWLY. The cross-axle should
lift simultaneously from both the inner and outer stands (see sketch).
- If the cross-axle lifts from the outer stand first, the cross-axle
stay is too loose. Care should be taken not to jack the car too far off
the stands. 1/2" to 1" should be sufficient. If the outer end is more
than 1/4" off of the stand and the inner end has not lifted yet, the stay
is much too loose.
- Tighten the cross-axle stay until the cross-axle lifts off of both
stands simultaneously. The cross-axle is not properly tensioned. No
advantage is to be had by significantly increasing the tension.
- Repeat the above steps for the other side.
 Safety comments
- During assembly ASSURE that the hubs have not been reversed. Look at
each knock-off and make sure it threads in the same direction as the rear
wheel on the same side. If you have removed the hubs, and install them in
the reversed direction (threads going the wrong way), you will loose a
wheel. It is no fun --- so check!
- Check every nut and bolt again after you have put about 100 miles on
the car. Also check for wheel bearing play and take-up if required.
- Have the alignment checked after bushing replacement.
- When working on the front suspension, the cross-axle must be seated
on jack-stands or their equal. Don't work on the car with it resting on
the Morgan jack. (Ed. or cinder blocks - See Misc topics - Safety
for a sad story.)
- Make sure the caliper securing bolts have been safety wired such that
the wire will tend to tighten the bolts (see sketch).
- Be sure to bleed the brakes if the pipes have been disconnected
(Drumbrakes).
Adjusting Headlamps
Adjusting the headlamps on your Morgan is a relatively simple task. All
you need is a screwdriver and a wall to shine the lights on.
Park the car about three feet from your garage door (or other wall) with
the lights on low beam. You may need to do this at dusk or even in the
dark to tell exactly where the light is shining on the wall.
Mark the outline of the beam shining on the wall with a pencil and them
move the car back 25 feet from the wall. The top of the low beam should
be no higher than the top of the circle on the door, and no lower than the
center of the circle.
If the beam shines outside the circle, use the screwdriver to turn the
adjustment screws on either side and above the headlamp housing. Turning
the screws will cause the beam to move left to right, or up and down on the
wall. A little experimenting will show you how to adjust the lights to fit
the marks on the wall.
Once the low beams are adjusted, the high beams should be in the right spot
also.
If you install halogen headlamps, you will find that the highly concentrated,
white beam does an excellent job of illuminating the road at night. However,
halogen lights must be adjusted more precisely, because the beam is more
concentrated and there is less margin for error.
Return to the Index of Tech. articles
To email me with comments or
questions.