NUMBER: 67-52
DATE: 4-24-67
GROUP: Front Suspension
SUBGROUP: Ball Joints
MODELS: All Sunbeam Models Except Arrow & Imp
SUBJECT: Ball Joint Checking Procedure
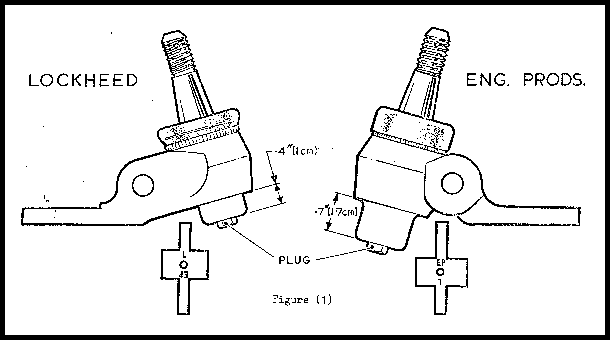
In order to assist you in properly servicing ball joints as outlined in the Certified Car Care and Service Manuals, a new special tool is now available, fig. (1), for checking ball joints. One of these tools will be supplied to you on a no-charge basis through your distributor.
The new tool should be used in conjunction with the following detailed checking procedure:
LOWER BALL JOINTS
- Place car on suitable stands or a hoist.
- Carefully examine the boot seal for any sign of damage being sure that the boot is correctly positioned in the retaining groove on the ball joint and that the retaining spring is correctly located all the way around.
- Remove the base plug from the base cap of the ball joint and clean off excess dirt especially around the screw hole.
- Establish the make of each ball joint as shown in fig. (1) i.e., Lockheed or Engineering Production.
- Using the special tool, insert the correct end into the hole according to make of the ball joint.
NOTE: The short end identified by "L" should be used for checking Lockheed Ball Joints which have a shallow base cap approximately .4" deep, and the long end "EP" for Engineering Production Ball Joints having a deeper cap .7".
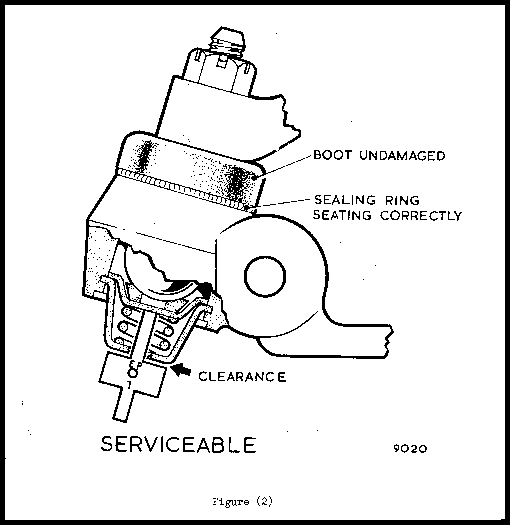
- With the checking tool held as far into the ball joint as it will go, check for any clearance between the base cap of the joint and the shoulders of the tool as shown in fig. (2). If there is any clearance at this point, and the sealing boot is not damaged and the sealing ring is seating correctly, then the joint is serviceable.
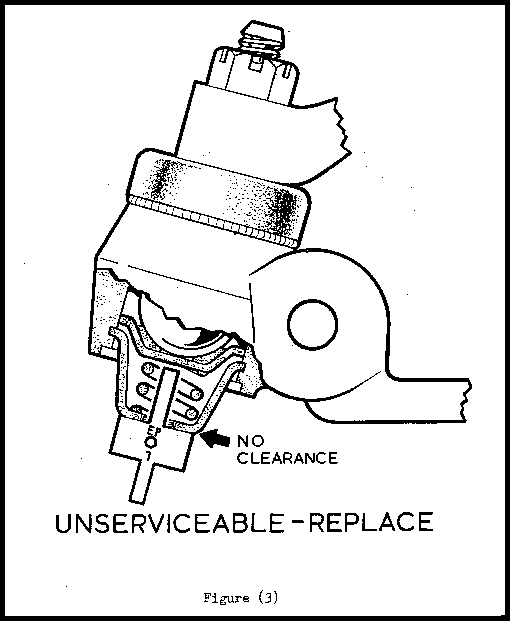
If there is no clearance, as shown in fig. (3) or the sealing ring has been misplaced, then that ball joint is not serviceable and must be replaced.
NOTE: Under no circumstances should an attempt be made to lubricate this ball joint.
UPPER BALL JOINTS
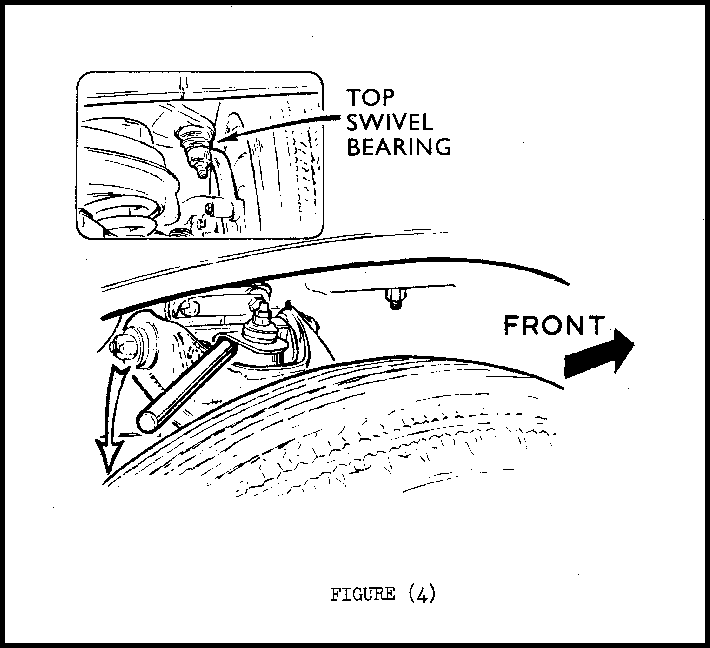
- Working from beneath the car, insert a short lever approximately 10" long in the position shown in fig. (4).
- Push down on the lever and at the same time check for any free movement in the ball joint.
- Inspect rubber boot for damage.
- Replace ball joint if there is damage to the boot or internal movement noted.
Additional special checking tools are available through your Distributor under part #RG-529. UNDER NO CIRCUMSTANCES SHOULD HAND MADE CHECKING TOOLS BE USED.


T.H. Bullard
Manager -- Service & Parts
