Used with the author's permission
It all started with a simple article in Practical Classics November 1985 called "Goodbye DC....Hello AC!". After reading this article and since it was so easy to do, I decided to put an alternator on my Series II Alpine. One of my restoration goals is to make my Sunbeam as reliable as possible. Any parts that can be replaced with modern ( = easily obtainable) components make any classic a little more enjoyable to drive. Who is going to miss unscheduled rechargings and dead batteries? After four months, many trips to the auto parts store and much reading and researching in the library it's finally running. To save others from solving the same problems, I thought I would share my experiences. (What else can you call them?) Please note that this installation is for a Series II. There may be some differences for a Series I, III, or IV but I'm sure an alternator can be installed on these autos also.
So off the junkyard I went and soon I returned with a used General Motors alternator with an internal regulator. A little bracked adaptation, simple rewiring and in five minutes I'd be finished. (RULE #1 - THERE ARE NO FIVE MINUTE JOBS.) After removing the stock generator and an hour of fitting I found out that the only way this alternator would fit would be to remove the stock headers or to grind away the front engine mounting plate. (RULE #2 - IT'S ALWAYS A GOOD IDEA TO MEASURE BEFORE ANY JOB.) Both of these options were unacceptable (Anyone need a good used General Motors alternator?) so with ruler in hand I measured the space for the generator and starting to think (RULE #3 - THINK!) I brought with me to my favorite auto parts store (Sparomobile, Downers Grove, IL) an alternator bracket from a Series V. (RULE #4 - ONLY MAKE CUSTOME PARTS IF YOU HAVE TO.) A good parts person who is willing to help make something work is the best friend a restorer can have. (RULE #5 - BE EXTREMELY NICE TO AUTO PARTS COUNTER PEOPLE.)
The first alternator we measured was for a Series V Alpine. It was too big. Next we tried a 1971 Plymouth Cricket alternator. (This car was a Sunbeam in disguise.) It was also too big. A quick trip to the back room and he returned with a Mitsubishi alternator built by Lucas. It fits 78-80 Datsun Pickups, 82-84 Mazda B2000s, and 82-84 Ford Couriers. It was small and had an internal voltage regulator. The price was steep, $90 rebuilt, but it fit and bolted up to the Series V bracket. The only modification was to tap the outer bolt hole in the alternator to an English thread (5/16 - 24). By relocating the generator belt tension bracket on the water pump everything bolted up. Now all that was left was the wiring.
The Series II Alpines are a positive ground system, therefore before cutting any wires, your car must be converted to a negative ground system. This has been nicely covered in a previous Tech Tip so I won't go into any detail on this. It is very easy to do. Be sure everything is okay with your generator powered negative ground system before you continue your alternator installation. (RULE #6 - WHEN FACED WITH THE UNKNOWN, ONLY CHANGE ONE THING AT A TIME.)
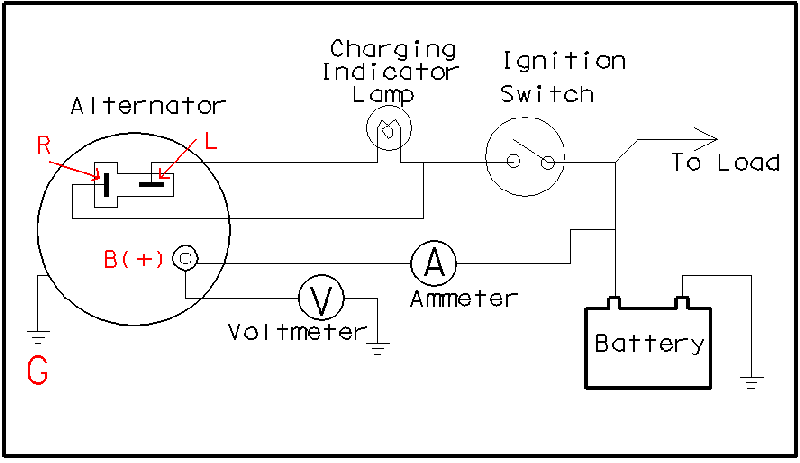
Figure 1 is a schematic of the wiring for a Mitsubishi alternator. The alternator has four terminals: R = Sensing Wire, L = Load, B = Battery, and G = Ground. The only important note is that if your car has no charge indicating lamp, a heavy duty 15 ohm resistor must be wired where the lamp is shown.
Figure 1 - Alternator Wiring Diagram
R = Sensing Wire
L = Load
B = Battery
G = Ground
Table 1 gives the wiring of the stock voltage regulator. It's a good idea to label the wires as you remove them one at a time. (SEE RULE #6.) Don't be too surprised if your wire colors are different. Remember your car is a Sunbeam and could have been changed over the years or at the factory. Also I'm a little color blind and could have gotten the colors wrong. Next, remove the voltage regulator and generator and save. (RULE #7 - NEVER THROW AWAY ANY SUNBEAM PARTS.) Then connect the alternator as given in Table 2.
| Terminal | Color Wire | Connects To | For Alternator |
|---|---|---|---|
| A1 | Blue-Brown | Ignition Switch | B |
| A | Violet | Non-Battery Side of Ammeter | B |
| F | Brown | Generator | Not Used |
| D | Yellow | Ignition Light | L |
| D | Yellow-Brown | Generator | Not Used |
| E | Black | Ground | Not Used |
Be sure to keep the wire gauges the same size as the original wiring. I bought a two prong plug that fits the alternator to keep the installation neat, but well insulated quick slide wire terminal connectors will do. The only new wire to run is for the "R" terminal or sensing connection. I made the connection at the ignition switch where the wire runs from the ignition light to the ignition switch.
Once everything is connected try turning the key on. The ignition light should come on. Turn on the headlights and check if the ammeter is reading okay. If everything works you're almost finished. If not then check your wiring.
The last step is to buy a new belt. I found that a 9.5mm x 938mm belt will work but it's a very tight fit over the pulley. A 945mm may be a better choice. Just to be on the safe side, I wrapped some hight temperature insulation on the first header tube to try and keep some heat away from the alternator.
That's it! Turn the engine on, rev it, and if the ignition light goes out, everything is working and your dead battery problems are over.