LOCKS:
HOW THEY WORK
HOW TO MAKE NEW KEYS
HOW TO PATTERN THEM TO ONE KEY
Imagine yourself the 7th owner of a Sunbeam and that you were given 3 keys, all of which will start the car, and none of which will open the doors. Sound familiar? Well you can change things around so that you do not need something better than a bread knife to start the car and you can have one key to fit everything. (Some ignitions will require a separate key as the blank is different.) All the locks on Sunbeams work in the same manner. (I am referring to Alpines and Tigers with one-sided keys, although I think everything will also apply to the early Alpines which use two-sided keys in the door locks.) The only different thing about each type of lock, ignition, door, cubby box, and trunk is how each comes apart.
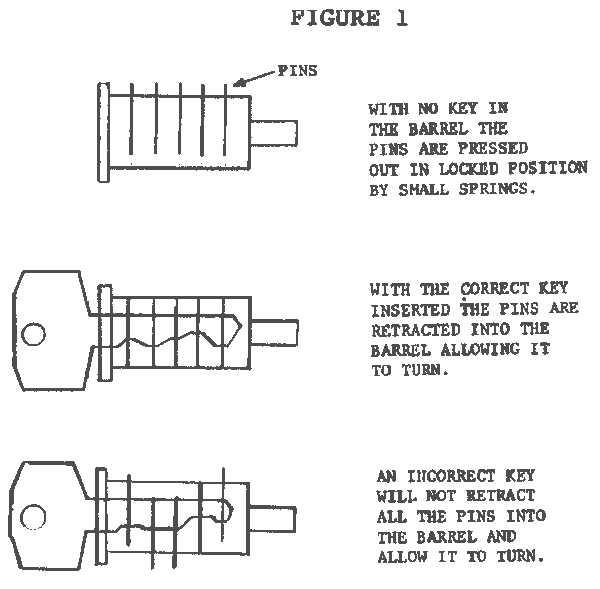
The principle on which all the locks work is that 5 spring-loaded pins are held out into a slot, in the body of the lock. When a properly matched key is inserted, the pins are withdrawn into the barrel of the lock which is then free to turn (see Fig. 1). To repair any locks, you will need a small file; a few key blanks; the lock removed and in your hand; and a little patience. (A good locksmith will supply you with blanks if you give him a key to look at. Dominion locks make the proper blank. Some ignitions use a flat-sided key, so you will have to get a different blank for these ignitions or change ignitions.)
REMOVING LOCKS - DOORS
Remove door handle by rolling up the window, removing door panel and one nut inside where the front of the door handle fastens through the door skin. Peel back the door sealing rubber on the back of the door and remove the machine screw that holds the back of the door handle on. Now remove the rod inside door that connects key part of lock to the actual latch. This is somewhat tricky as it is hard to see. Persevere! Remove handle from door. On the back of the door handle you will find two small screws. Remove these to remove the lock barrel.
REMOVING LOCKS - IGNITION
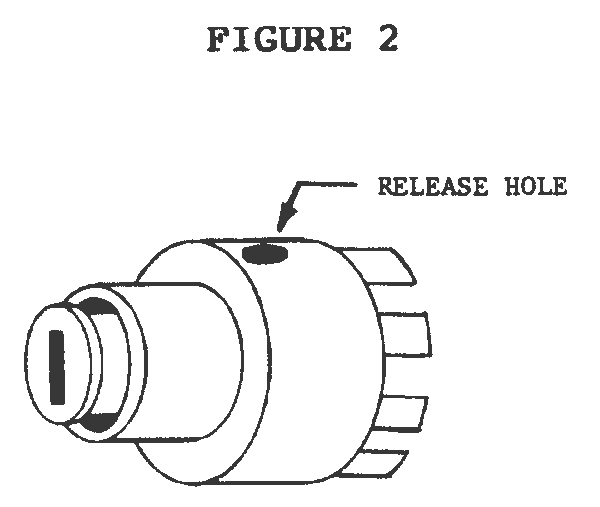
You can get this out without disconnecting the wires if you want. Just unscrew the front bevel and poke the lock through the back of the dashboard. The barrel is removed from the lock by poking a skewer or thin nail in the release hole in the body of the lock (see Fig. 2). At the bottom of this hole is a spring-loaded pin. Push the pin in and pull the front of the lock barrel out simultaneously. Before you run off to make a new key for this barrel, have a look inside the ignition body from whence you have withdrawn the barrel. If there is minor scoring on the edge of the slots, you will probably still be able to use this ignition body. If the scoring is very deep, then you will need a new one. The quick test for these locks is if you can start- the car with a bread knife, then you need a new ignition body.
REMOVING LOCKS - CUBBY BOX
The lock on the cubby box is quite easy to remove as long as the box is unlocked. If the box is locked, it must by pried open and fixed afterwards.
Remove the locking arm on the rear of the lock, then unscrew the retaining nut which holds the lock in place. Remove the lock from the hole.
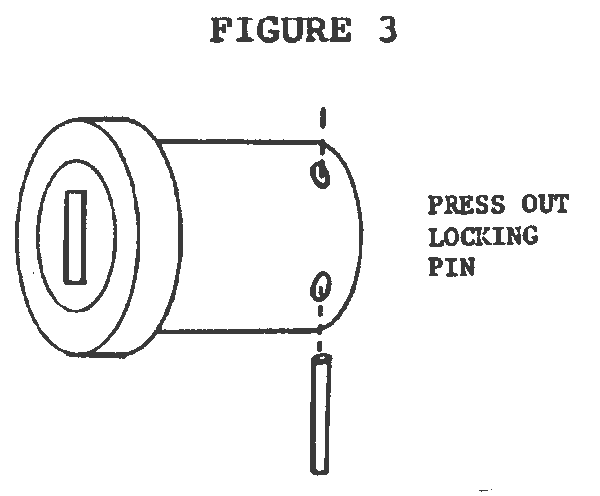
This lock has a pin that must be knocked out to remove the barrel. See Figure 3 for the location of this pin.
REMOVING LOCKS - TRUNK LOCK
The trunk lock is removed by removing the latching mechanism on the trunk. The lock will come out with it.
Remove the stud that protrudes from the rear of the lock. This is the adjustment for the release catch, so remember how far it was screwed into the lock. Also remove the part of the lock which the stud passes through and which was held in place by the locking nuts on the stud. The only thing which is now holding the barrel in the lock body is the pins themselves. There is a ring inside the body which prevents the barrel from being removed unless all the pins centered in the barrel. This can be accomplished without the correct key if one wiggles any key or skewer in the lock and depresses the pins one at a time, front to rear, while pulling at the barrel to remove it. It is not really very easy to do, but if you can spare 5 or 10 minutes, it will eventually come out.
CUTTING A NEW KEY
Now that you have the barrel out, push one of your blank keys into it. You will notice that the pins are sticking out the bottom at different heights. To make key for this barrel, you must file the key until all the pins are within the diameter of the barrel. Place the blank beside the barrel and to the depth at which the key penetrates. With your file scratch the side of the key at the 5 pin locations. This will help you keep track of where you are to file the key down.
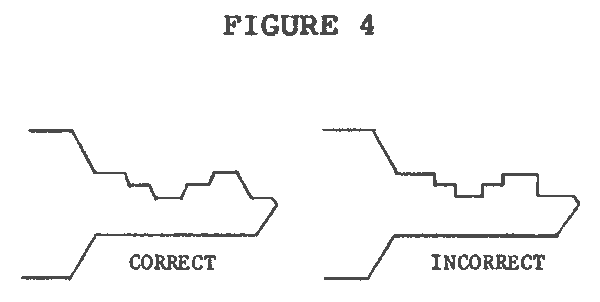
File the key from front to rear one pin at a time, checking your work frequently to make sure you haven't filed too far. One thing to be careful about is making sure that the key has no abrupt changes in height where you are filing it, as the key will not go in or come out easily, or at all (Fig. 4).
PATTERNING ALL YOUR LOCKS
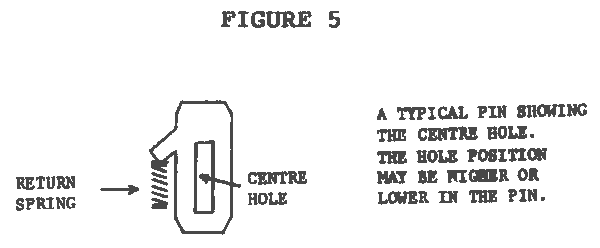
For this you will need several discarded locks as you will probably need the pins from them. All the pins are the same except for the location of the center hole (see Figure 5). To match all your locks to the same pattern you must gather together groups of 5 pins all with the same hole positions.
To remove the pins from a lock, grab the end of each pin with a pair of needle nose pliers and pull them out. Be careful not to lose the very tiny spring that is in the small hole beside the pin.
There are, I think, 5 hole positions possible in a pin, so you may have to take a number of locks apart to get enough pins with the same pattern to make up the combination that you wish to use.
When you have, say, 4 identical sets of 5 pins each you can reinsert these into the lock barrels in the same order and your doors, trunk and cubby box will all use the same key.
This should cover everything you have to know about making your own keys and patterning your locks.